How to draw a pasta well starts with a decision most tutorials skip: which shape you are drawing before your pencil touches the page. A plate of spaghetti behaves nothing like a single piece of penne, and a butterfly of farfalle needs a different guide-line skeleton than a spiral of fusilli. Pick the form first, and every stroke after that has a job. This guide walks through five shapes, the real measurements behind them, and the rendering tricks that separate a flat noodle from one that looks glossy and warm on the plate.
Art sites teach the pencil work. What they miss is the food itself. Knowing that a spaghetti strand sits at 1.92 to 2.00 mm while angel hair is barely 0.8 to 0.9 mm changes how you space your lines and how thin you draw the contour. That grounding is the whole point here. When you treat the subject as real food rather than an abstract squiggle, your drawing gains instant credibility.
Quick Answer: The Fast Path to a Pasta Drawing
To draw a pasta, sketch light guide lines first, then commit the final contour and erase the scaffolding. For long shapes like spaghetti, draw looping strands of uneven length to mimic how they naturally fall from a fork. For short shapes, build a simple 3D solid first. Think of a tube for penne, a spiral for fusilli, or a pinched bow for farfalle.
Once the shape is down, add an inner contour line to show thickness. Shade the side away from the light source, and lift highlights with a kneaded eraser to create a wet, cooked look. Color with warm yellows, light browns, and a touch of orange. Match your sauce tone to the noodle for a finished, believable plate that looks ready to eat.
Gather the Right Tools Before Your First Line
The right kit for drawing pasta is small, cheap, and specific. You need an HB pencil for the light sketch and a softer 2B to 4B for shadow and depth. Grab a standard eraser plus a kneaded eraser for lifting highlights. A blending stump or cotton swab is essential for smoothing tone. Keep decent paper and warm colored pencils on hand. Finally, keep a real box of pasta or a clear photo beside you as reference.
Reference matters more than raw skill at the start. Shape catalogs from makers like Barilla and DeLallo give clean, consistent photos of every form. These work far better than a blurry dinner snapshot. Your eye will correct proportions that your memory guesses wrong, saving you from drawing unnatural, rigid lines.
Paper Texture and Blending Choices
The surface you draw on dictates how the final noodle looks. Smooth bristol board works best for modern teflon-extruded pasta because the graphite glides evenly, leaving a clean edge. If you want to mimic traditional bronze-die extruded noodles, which have a rougher surface to hold sauce, choose a medium-tooth sketch paper. The slight bumpiness of the paper naturally creates the microporous texture of artisanal durum wheat.
When blending shadows, a rolled paper stump offers sharp control for tight crevices, like the inside of a penne tube. A cotton swab provides a softer, wider smudge, perfect for the gentle curve of a ravioli belly. Switch between them depending on how sharp the shadow needs to be.
Here is the working list, kept lean:
- HB pencil for the underdrawing and guide lines you plan to erase.
- 2B to 4B pencil for building shadow, ridges, and the darkest folds.
- Kneaded eraser to pull soft highlights off cooked, glossy surfaces.
- Blending stump or cotton swab to smear graphite into smooth tone.
- Warm colored pencils in yellow, light brown, and orange for realism.
If you want to sketch shapes you can actually name, a specs-first breakdown helps. Our specs-first field guide to pasta shapes and names lists the forms most people confuse, which makes choosing a subject far quicker.
Draw a Pasta by Shape: 5 Forms Step by Step
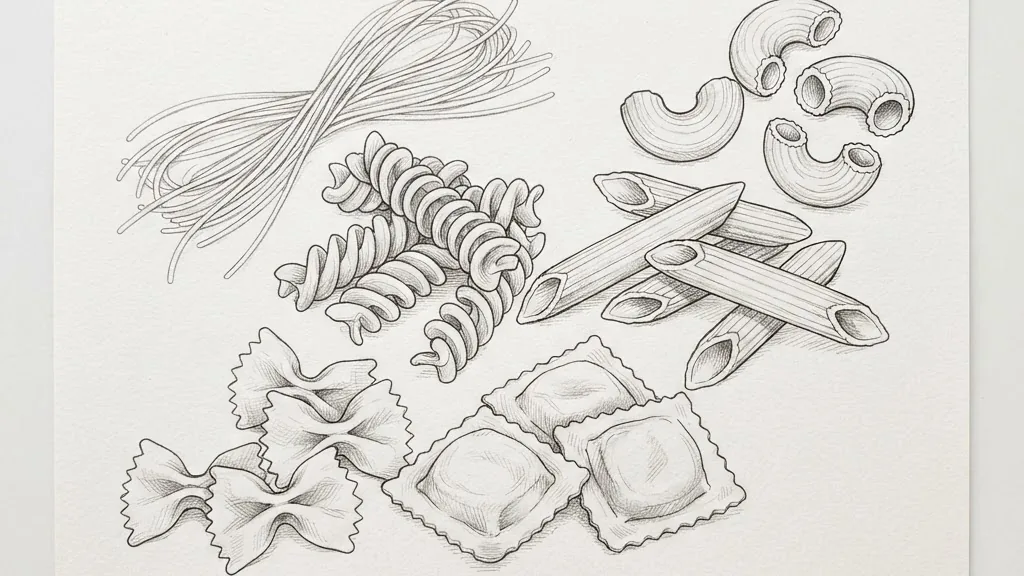
Five shapes cover almost every pasta drawing request: spaghetti, penne, fusilli, farfalle, and a stuffed shape like ravioli. Each one has a distinct build order. Long strands rely on flowing line work, while short shapes require you to build small 3D solids before adding surface detail. Draw them in this sequence and you learn both core skills at once.
Once the flowing contour and the built-up form feel natural, any of the roughly 350 recognized Italian pasta types becomes easy. They act as variations on something you already know rather than a brand-new problem to solve from scratch.
Spaghetti strands
Start with a loose tangle of overlapping curves. Vary the length on purpose, because real strands never line up perfectly. Since Italian spaghetti sits at 1.92 to 2.00 mm across, keep each drawn strand narrow and roughly even in width along its run. Add a faint second line inside a few strands where they catch light. That inner line is what sells the roundness.
A common mistake is drawing spaghetti lines too parallel, making them look like wire cables. To fix this, intentionally cross strands at odd angles. Let some dive under the pile and emerge on the other side. This captures the chaotic, organic way cooked noodles settle in a bowl.
Penne
Penne is a cylinder cut on the diagonal. Draw a tube, then slice both ends at an angle so you see the oval opening. Add short ridges running along the surface. The angled cut is the signature, so exaggerate it slightly for clarity. Keep the ridges parallel to the main tube, not the angled cut.
If your penne looks flat, check the thickness of the rim. You must draw a distinct inner oval at the open ends to represent the wall of the pasta. Shade the inside of that opening very dark with your 4B pencil to push it into shadow, immediately making the tube pop out in 3D.
Fusilli
Fusilli is a corkscrew. Draw a central axis line first, then wrap a ribbon around it with even spacing. Where the spiral turns away from you, darken it. Where it faces the light, leave it pale. The rhythm of the wrap is everything. If the spacing gets too wide, it looks like a stretched spring.
To master the spiral, try drawing a series of repeating ‘S’ curves stacked on top of each other. Connect the outer points of the curves with short diagonal lines. This method helps maintain a consistent width from top to bottom, which is crucial for a realistic extruded shape.
Farfalle
Farfalle is a rectangle pinched in the middle. Draw the two triangular wings, then the cinched center. Add crimped, wavy edges on the outer sides and a few pleats at the pinch. Small texture marks turn a flat bow into a folded one. Do not make the wings perfectly symmetrical, as real farfalle twists slightly when boiled.
Pay special attention to the central pinch. Draw two or three dark, short lines radiating out from the tightest point. These lines simulate the dense folds of dough that take the longest to cook, adding a crucial layer of structural realism to the bow tie.
Ravioli
Ravioli is a stuffed pillow. Draw a slightly puffed square, then run a crimped or zigzag border just inside the edge. A gentle bulge in the middle shows the ricotta or meat filling. Keep the corners soft, never sharp. A rigid square looks like a cracker, not boiled dough.
When shading ravioli, treat the central bulge like a sphere. Leave the highest point bright and fade into a soft shadow as the dough slopes down toward the crimped edges. This highlights the tension of the pasta stretched over the filling.
For a dinner-plate context around these shapes, the plating in our cheesy baked ravioli recipe gives you a real reference for how stuffed shapes cluster and overlap on a plate.
Build the Full Plate: Bowl, Sauce, Fork, and Meatballs
A finished pasta drawing is a scene, not a single noodle. Set the stage with the bowl first. Draw an oval in perspective, flatter than a perfect circle, so it reads as a dish seen from an angle rather than from directly above. Pile the noodles inside as a rounded mound, not a flat layer, because cooked pasta heaps.
Next, add a fork planted at an angle with a few strands wound around the tines. Drop in two or three meatballs, and pool the sauce into the low spots. That layering, from dish to food to utensil, is what makes the plate believable and dynamic.
The classic scene is spaghetti and meatballs, which is why so many tutorials default to it. But the same staging works for any shape. A short-pasta bowl reads just as well with a fork resting on the rim. Just remember to integrate the elements.
Watch these staging traps:
- Flat bowl: if the oval is too round, the dish looks tipped toward the viewer and the food spills visually.
- Floating fork: anchor the fork into the pile so it looks planted, not pasted on top.
- Even sauce: pool sauce in dips and let noodle tops stay lighter, since flat color kills depth.
- Perfect meatballs: real meatballs are lumpy and irregular, not perfect spheres. Draw small divots and bumps.
Want a real plated reference for winding long strands around a fork? The photos in our creamy chicken spaghetti recipe show how strands clump and drape, which is exactly the messy realism a good drawing needs.
Shade and Color So the Pasta Looks Cooked
Rendering is what turns an outline into food. Decide where the light comes from, then shade the opposite side of every strand, tube, and meatball. Use the HB pencil for light tone and the 2B to 4B for the deepest shadows in the folds and under the pile.
Blend with a stump or cotton swab until the transitions go smooth. Next, lift bright highlights with the kneaded eraser along the tops of the noodles. Cooked pasta is glossy and catches light in thin, bright lines. Texture comes from small dashes and dots suggesting the slightly rough surface of extruded durum wheat.
Color follows the same logic. Cooked pasta is not flat yellow.
- Base: apply warm yellow across the noodles as the mid tone.
- Shadow: lightly layer brown into the crevices and the underside of the mound.
- Depth: add a touch of orange where strands turn away, creating warmth.
- Sauce integration: match the sauce color to the dish and overlap it onto the noodles.
Pasta is made from durum wheat semolina and water, pushed through metal dies in a process called the trafila. This is why the surface has that faint drag texture worth suggesting with your pencil. If you want a vivid sauce reference to color from, the deep red in this fiery arrabbiata sauce guide shows exactly the orange-to-red range that reads as tomato on paper.
For plant-based plates with lighter, oil-glossed noodles, the images across a collection of vegan pasta recipes give you cleaner, sauce-light references to study before you commit color. These lighter dishes rely entirely on good shading to show depth, since they lack heavy red sauce to hide behind.
Draw It Right: Real Pasta Dimensions Most Artists Ignore
Getting proportions right is the edge a food-literate drawing has over an art-only one. Pasta shapes are defined by measurable dimensions. Long strands sit on a clear ladder of thickness. Capellini or angel hair sits at 0.8 to 0.9 mm. Fedelini measures 1.37 to 1.47 mm. Spaghetti lands at 1.92 to 2.00 mm, and vermicelli is slightly thicker at 2.08 to 2.14 mm.
Draw angel hair as fine as a whisper and spaghetti visibly heftier, and your work instantly reads as accurate rather than generic. These are not artistic guesses. They come straight from documented shape specifications in the culinary world, and you can verify the exact numbers on Wikipedia under their Vermicelli and Capellini articles.
Regulators enforce these numbers on both sides of the Atlantic. Under the US Code of Federal Regulations, the FDA standards of identity define spaghetti at 0.06 to 0.11 inches, which is 1.5 to 2.8 mm. The same regulations strictly define vermicelli at under 0.06 inches, or 1.5 mm. Knowing this helps you scale your drawing properly relative to a fork or a bowl.
A few figures worth drawing to:
- Die numbering: Spaghetti No. 5 comes from a 2.0 mm die, while Capellini No. 1 uses a 0.8 mm die, a system dating to roughly the 19th century.
- Length: modern spaghetti is usually packed at 25 to 30 cm (10 to 12 in), though traditionally it ran closer to 50 cm (20 in). Keep this in mind when drawing long, dramatic fork twirls.
- Variety: Italy recognizes around 350 pasta types. Counting global variants, the total can approach 1,000 forms.
The Unione Industriali Pastai Italiani sets much of the nomenclature and standards for pasta in Italy. Meanwhile, the National Pasta Association handles the US professional side and classifies vermicelli as a thinner spaghetti, separate from the Italian body.
For a general food-safety and labeling grounding on the products you are drawing, the USDA food and nutrition resources and guidance from FoodSafety.gov cover how these goods are categorized and stored. Adding this context makes your artwork technically grounded.
One kitchen figure worth an artist’s note: tiny stelline stars cook in about 5 minutes. This is a great reminder that shape and scale are tied together. The smallest forms are as short as they are quick, so draw them delicate and clustered tightly together.
Cute vs Realistic: Pick a Style, Then Fix the Common Mistakes
Two audiences want two different pasta drawings, and choosing early saves rework. The cute or kawaii version simplifies everything. You round the shapes, add big dot eyes and a small smile, drop the complex shading, and use flat bright color. This is the style that travels well on short-video platforms and works perfectly for kids.
The realistic version demands true proportions, layered shading, lifted highlights, and matched sauce tone. Neither is harder overall; they simply ask for different discipline. Decide which one you want before the first line. The guide-line skeleton is nearly the same, but the finishing techniques take separate paths.
Executing the Cute Style
If you choose the cute route, placement is everything. Place the two dot eyes wide apart and very low on the pasta shape to maximize the friendly look. Add two small pink oval blushes just below and outside the eyes. Keep the linework bold and confident, using a fineliner pen over your pencil sketch before adding flat, solid marker colors.
Most mistakes across either style are predictable, and each has a clean fix:
- Strands too uniform: real noodles vary in length and curl. Break the rhythm and let some strands run loose.
- Even spacing: clump some strands and open gaps elsewhere for a natural, organic tangle.
- Warped bowl: if the plate looks lopsided, redraw the oval flatter and symmetrical before adding any food.
- Flat color: in realism, add brown and orange accents. Otherwise, the plate stays cartoonish even when you wanted depth.
Adapt the difficulty to age and level. Younger artists do best with the cute route, focusing on just two or three shapes. Older or more practiced hands can attempt the full shaded plate with a fork, sauce, and meatballs. Both start from the exact same guide-line habit.
Level Up: Practice Sets, Downloads, and Where to Go Next
Repetition is how these shapes stick. Build a short practice loop rather than chasing one perfect drawing right away. Fill a page with a single form until the contour flows naturally, then move to the next. A printable worksheet, a step-by-step image set, and a timelapse video each speed this up by letting you copy pacing and pressure directly.
Coloring pages help younger artists focus on the warm palette without worrying about linework. The goal is muscle memory. Once your hand knows the spiral of fusilli or the pinch of farfalle, the shapes come out clean without conscious effort every single time.
Pairing your subject with a real recipe makes practice more fun, since you draw what you might cook.
- Sketch short shapes and greens with our spring veggie gnocchi recipe as a color reference.
- For artists who cook what they draw, browse this roundup of gluten-free pasta and pizza ideas to see how alternate flours change noodle texture.
- If you want a protein-focused plate to plan and plate, a set of high-protein recipes gives you hearty, dense subjects to study and draw.
Frequently Asked Questions
What is the easiest pasta shape to draw first?
Spaghetti strands are the easiest starting point because they are pure line work with no 3D construction required. Draw loose, overlapping curves of uneven length. Keep each strand narrow, and add a faint inner line for roundness. Once the flowing contour feels natural, you can move to short shapes like penne, which require building a small solid form instead.
How do I draw pasta so it looks cooked and glossy?
Shade the side of each strand away from your light source using a 2B to 4B pencil. Then, lift thin highlights along the tops with a kneaded eraser. Cooked pasta is glossy and wet, so those bright, erased lines matter most. Color with warm yellow, layer light brown into the shadows, and add a touch of orange where strands turn away from the eye.
What pencils work best for drawing pasta?
Use an HB pencil for the light guide lines and the initial sketch. Once the layout is right, switch to a softer 2B to 4B pencil for shadows, surface ridges, and the darkest folds hiding under the pile. A kneaded eraser lifts bright highlights, and a blending stump or cotton swab smooths graphite into an even, appetizing tone. That small kit handles everything.
How thin should I draw angel hair compared to spaghetti?
Draw angel hair, or capellini, noticeably finer than spaghetti. Real capellini measures 0.8 to 0.9 mm across, while spaghetti sits at 1.92 to 2.00 mm. On paper, angel hair should look roughly half as thick. Matching that precise ratio is what makes each long shape instantly recognizable instead of just looking like a generic noodle tangle.
Should I draw a cute pasta or a realistic one?
Choose based on your audience. The cute style uses rounded shapes, wide-set dot eyes, and flat bright color. It performs incredibly well for kids and short-video platforms. The realistic style keeps true proportions, layered shading, and matched sauce tone. Both start from the same guide lines, so decide before finishing, since the linework overlaps but the rendering drastically differs.
How many pasta shapes should a beginner learn?
Start with five specific shapes: spaghetti, penne, fusilli, farfalle, and a stuffed shape like ravioli. Those cover the two core skills of flowing strands and built-up solids. Since Italy officially recognizes around 350 pasta types, mastering these foundational five means almost any other form becomes a simple variation on something you already know, rather than a completely new challenge to figure out.